Get started on GOV.UK
This getting started guide is for new technical staff (for example developers, technical architects) working on GOV.UK in GDS. Please note this guidance is only for the GOV.UK programme of GDS, it is not for Digital Identity, Digital Services Platforms or any other part of GDS.
Ask your tech lead to take you through the overview slides if they have not already done so.
If you’re having trouble with this guide, you can ask your colleagues on the #govuk-developers Slack channel or using email.
Before you start
You must have a laptop with full admin access. To check if you have full admin access, run a sudo
command in your command line. For example, sudo ls
.
If you do not have full admin access to your laptop, ask your line manager to ask IT to provide you with a developer build on your laptop.
Once you have full admin access on your laptop, run the following in your command line to install the Xcode command line tool:
xcode-select --install
1. Install the Homebrew package manager
Run the following in your command line to install the Homebrew package manager:
/bin/bash -c "$(curl -fsSL https://raw.githubusercontent.com/Homebrew/install/master/install.sh)"
This command works for macOS or Linux.
2. Generate a SSH key
If you have a YubiKey
If you have a YubiKey, you will use gpg-agent
in place of ssh-agent
, which requires a GPG key to have been generated.
Create a GPG key as per the Create a GPG Key documentation.
Add the following to the
~/.gnupg/gpg-agent.conf
file:
enable-ssh-support
pinentry-program /usr/local/bin/pinentry-mac
default-cache-ttl 60
max-cache-ttl 120
- Add the following to your
~/.zprofile
file:
export GPG_TTY=$(tty)
export SSH_AUTH_SOCK=$(gpgconf --list-dirs agent-ssh-socket)
gpgconf --launch gpg-agent
Run
killall gpg-agent
to stop any runninggpg-agent
processes.Run
ssh-add -L
. This will output your public SSH key, which should endcardno:000000000000
(indicating it is from a YubiKey).
If you do not have a YubiKey
Generate a new SSH key for your laptop and add it to the ssh-agent for your GitHub account.
Add the following code into your
.zshrc
,~/.bash_profile
, or equivalent so that it is persistent between restarts:
$ /usr/bin/ssh-add -K <YOUR-PRIVATE-KEY>
3. Set up your GitHub account
- Set up a GitHub account. You can use your existing personal account.
- Associate your GitHub account with your GDS email address, this can be in addition to your personal email address.
Ask a developer on your team who has production access (e.g. your tech lead) to add your GitHub username to the user monitoring system.
If no other developers on your team are available, ask in the Technical 2nd Line Slack channel for someone to add you.
Email govuk-github-owners@digital.cabinet-office.gov.uk to request to be added to the alphagov organisation and the GOV.UK team to get access to repos and CI environment, add your tech lead a CC of the email. Please explain in the email which team you are working on and in what role; include a link to the pull request created in the previous step.
Once this request has been actioned you’ll receive an email from GitHub, select Accept in the email.
Test that the SSH key works by running
ssh -T git@github.com
.Add your name and email to your git commits. For example:
$ git config --global user.email "friendly.giraffe@digital.cabinet-office.gov.uk" $ git config --global user.name "Friendly Giraffe"
4. Install GDS command line tools
On GOV.UK we use the following command-line tools for AWS and SSH access:
To install these command line tools, run the following in the command line:
brew tap alphagov/gds brew install gds-cli govuk-connect brew install --cask aws-vault
The GDS CLI repository is private, so you must first set up your GitHub account.
Test that both tools work by running
gds --help
andgds govuk connect --help
.If you see a
fatal: no such path in the working tree
error, that’s because you’re using ZSH, which hasgds
set up as a Git alias. To solve this, you can either:- remove that alias by adding
unalias gds
to your~/.zshrc
- use
gds-cli
instead ofgds
for all the relevant commands
- remove that alias by adding
Configure the GDS CLI by running:
gds config email <FIRSTNAME>.<LASTNAME>@digital.cabinet-office.gov.uk
Run
gds config yubikey false
if you use your phone as an Multi-Factor Authentication (MFA) device.Run
gds config yubikey true
if you use a Yubikey.
5. Connect to the GDS VPN
If you’re outside of the office or on GovWiFi, you must connect to the GDS VPN to access to our infrastructure and internal services.
For GDS issued MacBooks
Follow the GDS guidance on how to sign into the GDS VPN using Google credentials.
For Bring Your Own Devices (BYOD)
Follow the VPN guide for Bring Your Own Devices (BYOD)
6. Set up GOV.UK Docker
We use a govuk-docker
Docker environment for local development.
To set up GOV.UK Docker, see the installation instructions in the govuk-docker
GitHub repo.
You can also try developing outside of Docker, using tools like rbenv directly. This approach generally works for frontend apps but not for other apps with databases, etc., and is not officially supported.
7. Get SSH access to integration
If you are a frontend developer you do not need to complete this step as part of your initial setup.
Get access
Ask a developer with production access on your team (e.g. your tech lead) to add your SSH username (firstnamelastname
) to the list of GOV.UK tech users in the user monitoring system.
Create a user to SSH into integration
User accounts in our integration environments are managed in the govuk-puppet repository.
Run the following command to create a
govuk
folder in your home directory and clone thegovuk-puppet
GitHub repo:mkdir ~/govuk cd ~/govuk git clone git@github.com:alphagov/govuk-puppet.git
Add your SSH key which you created in step 2.
If you do not have a YubiKey, run more ~/.ssh/id_ed25519.pub
to retrieve your public key. The key should begin with ssh-ed25519 AAA
and end with == <WORK EMAIL>
. If you have an existing RSA public key you could add that instead, although ed25519 keys are preferable. An RSA public key will start with ssh-rsa AAA
. You may need to manually add the email address to the end of your key.
If you have a YubiKey, run ssh-add -L
to retrieve the key from your device. The key should end with cardno:000000000000
.
Create a user manifest file at
~/govuk/govuk-puppet/modules/users/manifests/<FIRSTNAMELASTNAME>.pp
with the following code:# Creates the <FIRSTNAMELASTNAME> user class users::<FIRSTNAMELASTNAME> { govuk_user { '<FIRSTNAMELASTNAME>': fullname => 'FIRSTNAME LASTNAME', email => 'WORK EMAIL', ssh_key => '<SSH-PUBLIC-KEY-VALUE>', } }
Enter your information and SSH public key value into the file. For example:
# Creates the johnsmith user class users::<johnsmith> { govuk_user { '<johnsmith>': fullname => 'John Smith', email => 'john.smith@digital.cabinet-office.gov.uk', ssh_key => '<SSH-PUBLIC-KEY-VALUE>', } }
Add the name of your user manifest file (
<FIRSTNAMELASTNAME>.pp
) into the list ofusers::usernames
inhieradata_aws/integration.yaml
.Create a pull request with these changes and ask a developer in your team to review it.
Once the pull request has been reviewed, you can merge it and the pull request will automatically deploy to the integration environment.
Access remote environments and server
Once your pull request with your user manifest file is merged and deployed, you should test your SSH access to remote environments and servers.
If you are outside of the office or on GovWiFi, you must first connect to the GDS VPN.
Test your SSH access by running:
gds govuk connect --environment integration ssh backend
If you see an error Permission denied
, check the message shown later, similar to: The SSH username used was: jsmith
- if this is not the user you specified in the puppet config above, you need to specify a username:
USER=jaysmith gds govuk connect --environment integration ssh backend
(or you can export USER=jaysmith
separately to set it for a shell session)
If you see an error similar to no matching host key type found. Their offer: ssh-rsa,ssh-dss
you will have to change your ssh configuration - this is an issue with OSX Ventura (and possibly other operating systems) - see this StackOverflow issue
You need to add the following into your ssh config (e.g. ~/.ssh/config
):
Host *
HostkeyAlgorithms +ssh-rsa
PubkeyAcceptedAlgorithms +ssh-rsa
Note this may happen even if you don’t use an rsa ssh private key - it is caused by the host key which is defined by the server you connect to, not your user key which you have defined.
Running a console
Once you have SSH access into a remote environment or server, you can also open a Rails app console for a particular application so you can run commands.
For example, to open a console for GOV.UK Publisher, run the following on a backend
machine:
$ govuk_app_console publisher
As a shortcut, to remove the need to look up the machine class for an application, you can use the following without SSHing first:
gds govuk connect --environment integration app-console publisher
8. Get AWS access
If you are a frontend developer you do not need to complete this step as part of your initial setup.
GDS maintains a central account for AWS access.
You must have access to this GDS account to work with govuk-aws and govuk-aws-data.
The notes below are a summary - the definitive guide lives on the reliability engineering site.
Request access to the GDS AWS account
You request access to the GDS AWS account through the Request an AWS account form.
Select Request user access to request access to the GDS AWS account and complete the form.
After submitting the form, you should receive an email to say your account creation is in progress, and later another email saying the work has been completed.
Sign in to AWS
To sign in, go to the gds-users
AWS console, and enter:
gds-users
in Account ID or alias- your
@digital.cabinet-office.gov.uk
email address in Username - your AWS account password in Password
Set up Multi-Factor Authentication
You must set up Multi-Factor Authentication (MFA) to access AWS.
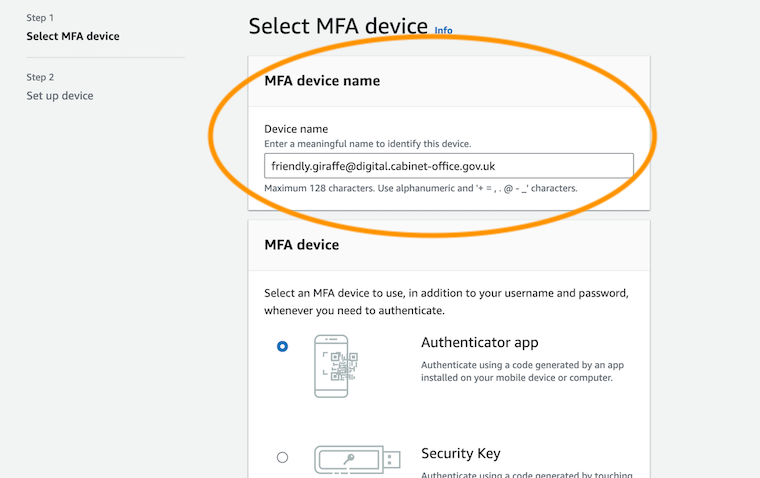
You may add up to 8 MFA devices. However, note that MFA device names must be prefixed with your IAM username (usually your email address), otherwise you will receive a permissions error.
How you set up MFA depends on whether you have a GDS-issued Yubikey or not.
If you do not have a Yubikey
Use the following instructions to set up your MFA device.
- Sign in to the
gds-users
AWS console. - Select the IAM service.
- Select Users in the left hand menu and enter your name.
- Select the link for your email address.
- Select the Security credentials tab.
- Select Manage, which is next to Assigned MFA device.
- Specify your email address as the MFA device name
- Follow the instructions to set up your MFA device.
If you have a Yubikey
- Download the Yubico Authenticator app to your computer (or mobile device, if your Yubikey supports NFC).
- Sign in to the
gds-users
AWS console. - Select the IAM service.
- Select Users in the left hand menu and enter your name.
- Select the link for your email address.
- Select the Security credentials tab.
- Select Manage, which is next to Assigned MFA device.
- Specify your email address as the MFA device name
- When asked to scan the QR code with your mobile device, open the Yubico Authenticator app and use that to scan the QR code. The MFA code will now be present on your Yubikey.
- Configure gds-cli to use the YubiKey:
gds config yubikey true
Generate a pair of access keys
You must generate an AWS access key ID and secret access key to be able to perform operations with AWS on the command line.
- Sign in to the
gds-users
AWS console. - Select your email address in the top right of the screen.
- Select My Security Credentials.
- Select Create access key.
- Make a note of your AWS access key ID and secret access key for when you access AWS for the first time.
Get access to integration infrastructure
You must get access to the integration infrastructure so you can deploy to integration.
To get access, you must add your email address to the list of role_user_user_arns
users in the govuk-aws-data
GitHub repo.
Open a pull request to add the following code to the role_user_user_arns
section in the infra-security/integration/common.tfvars
file in the govuk-aws-data
repo.
arn:aws:iam::<account-ID>:user/<firstname.lastname>@digital.cabinet-office.gov.uk
Use the same <account-ID>
as other entries in the role_user_user_arns
section.
See this example pull request for more information.
After your pull request has been merged, someone with production access will need to deploy the
infra-security
project to integration, by assuming the govuk-integration-admin
role.
See Deploy Terraform
to find out how to deploy infrastructure changes. The stackname is govuk
and the project is
infra-security
.
See the AWS IAM users documentation for more information.
9. Access AWS for the first time
If you are a frontend developer you do not need to complete this step as part of your initial setup.
- Open the GDS CLI and run
gds aws govuk-integration-readonly -l
to open the AWS console in your web browser. - In the GDS CLI, enter your AWS access key ID and secret access key.
Enter your MFA token in the command line.
Here is an example of the output you’ll see:
$ gds aws govuk-integration-readonly -l Welcome to the GDS CLI! We will now store your AWS credentials in the keychain using aws-vault. Enter Access Key ID: <YOUR-ACCESS-KEY-ID> Enter Secret Access Key: <YOUR-SECRET-ACCESS-KEY> Added credentials to profile "gds-users" in vault Successfully initialised gds-cli Enter token for arn:aws:iam::123456789012:mfa/firstname.lastname@digital.cabinet-office.gov.uk: 123456
When prompted, save credentials to your Mac’s keychain as
aws-vault
and set a password for the keychain. Save that password somewhere safe, for example in a password manager.
If you have a GDS-issued Yubikey, you can run gds config yubikey true
in the GDS CLI to set GDS CLI to automatically pull the MFA code from your Yubikey.
You have completed the get started process. You can now use gds aws
to run generic aws CLI commands by prefixing them with gds aws <role>
. For example:
$ gds aws govuk-integration-readonly aws s3 ls
Reset your AWS vault password
If you forget your aws-vault
password, you must reset that password.
- Delete the
aws-vault
keychain by runningrm ~/Library/Keychains/aws-vault.keychain-db
in the command line. - Re-initialise the
gds-cli
by opening~/.gds/config.yml
and changinginitialised: true
toinitialised: false
.
10. Set up tools to use the GOV.UK Kubernetes platform
Follow the instructions for setting up tools to use the GOV.UK Kubernetes platform.
11. Get a Signon account for integration
Signon is the application used to control access to the GOV.UK Publishing applications.
Ask another developer to create an account for the integration Signon, at ‘Superadmin’ level with permission to access the applications that your team are likely to work on.
12. Get access to the Release app
Release is the application we use to track deployments, work out which branch/tag is deployed to each environment and link to Jenkins to deploy code.
Ask someone with production access (e.g. your tech lead or buddy) to create an account for the production Signon, at ‘Normal’ level with access to the ‘Release’ app only. No permissions should be given for other applications, until production access is granted.
Supporting information
Now you have completed the get started process, you should look at the following supporting information: